> ## Documentation Index
> Fetch the complete documentation index at: https://docs.maestrobots.com/llms.txt
> Use this file to discover all available pages before exploring further.
# Sell Settings
> Configure your sell preferences in Maestro: auto-sell, trailing sell, preset sell limits and the controls that manage how you exit a trade.
Selecting the ⚙️ *Sell* button reveals the following menu:
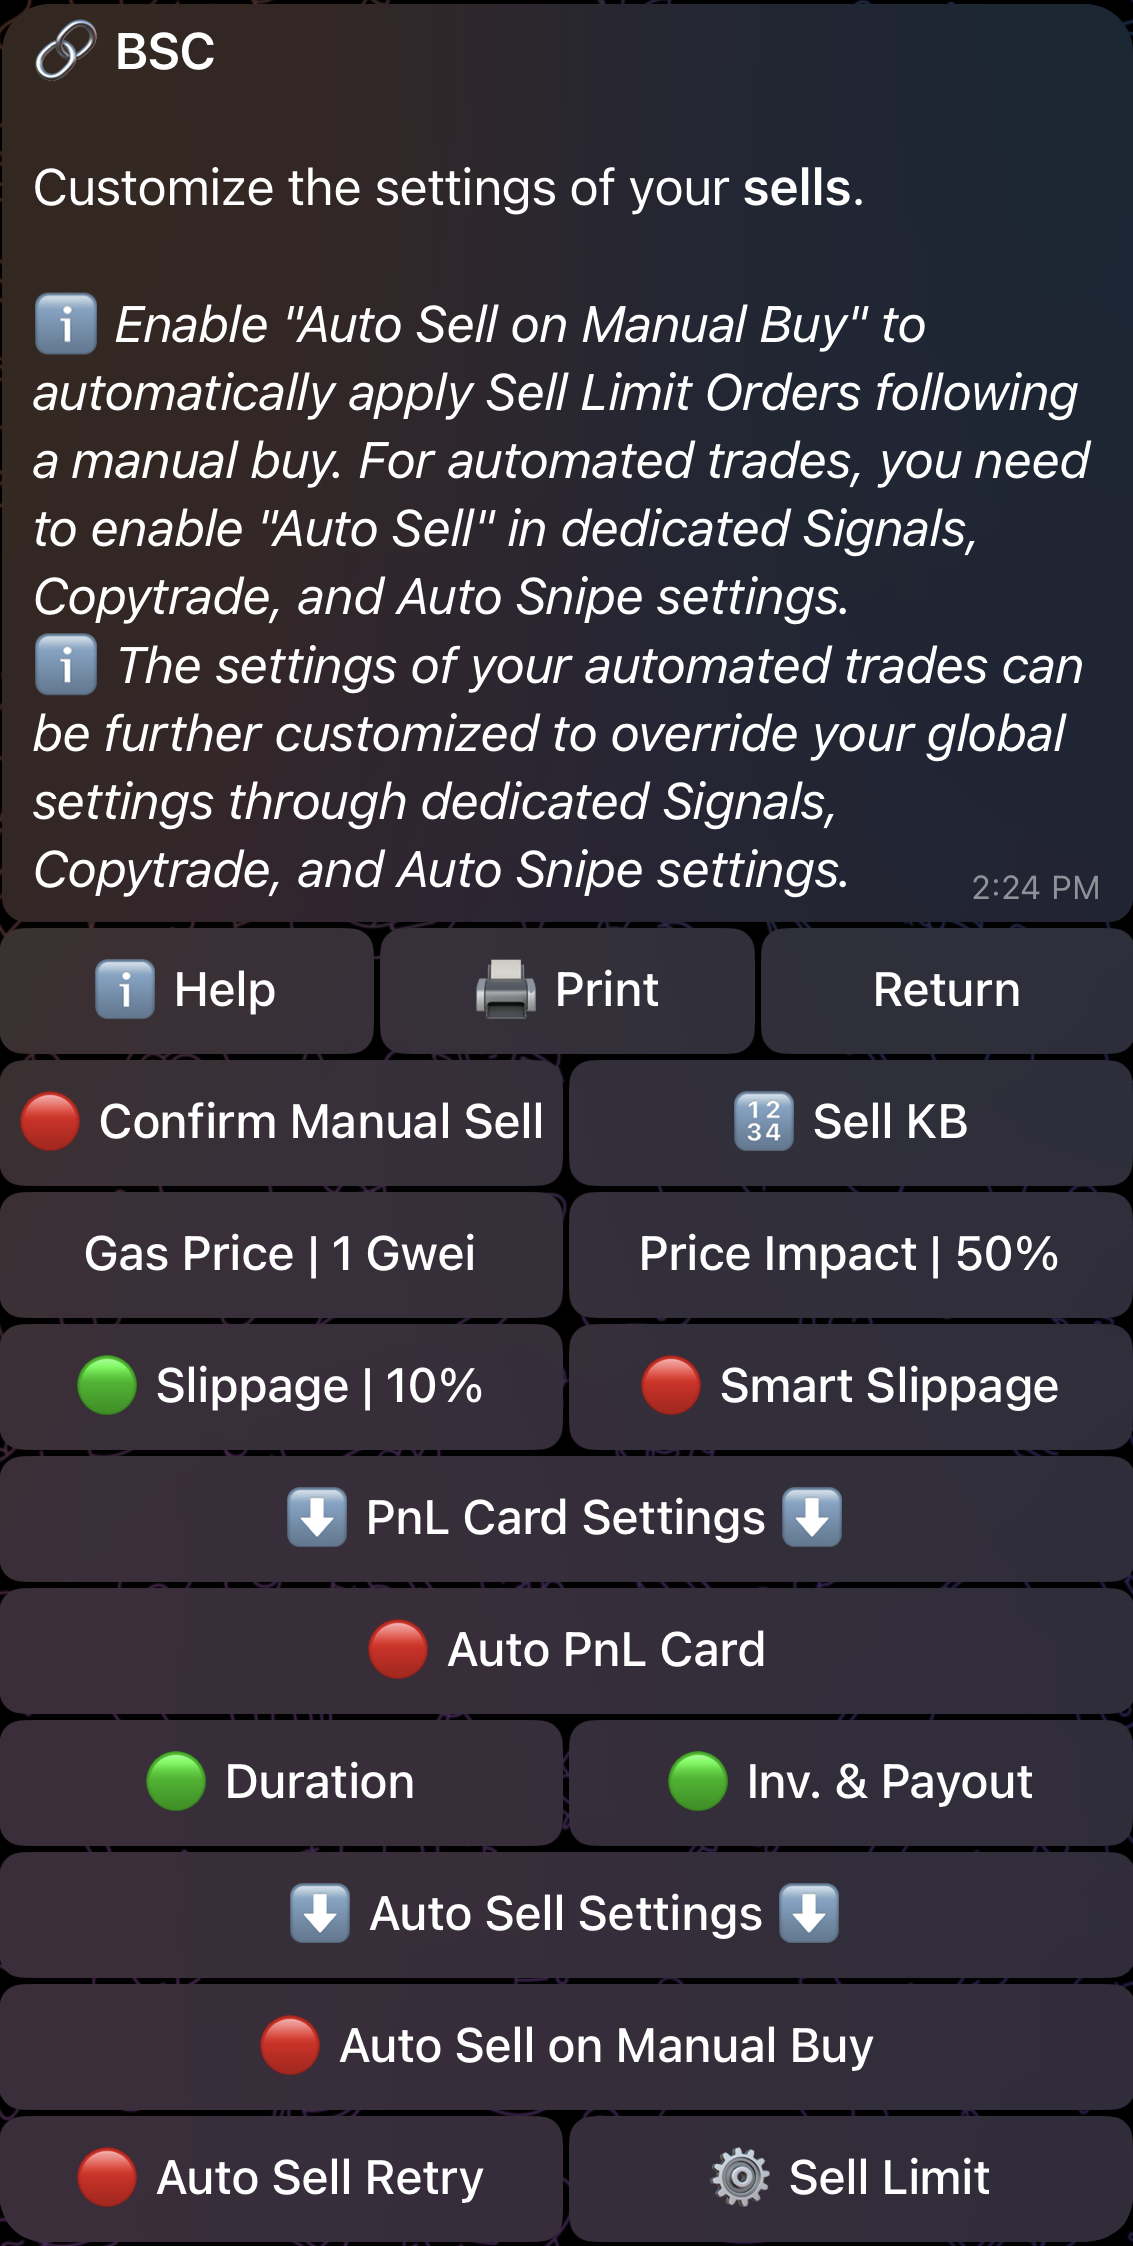 We explain the available options below:
### 🟢 | 🔴 Confirm Manual Sell
When enabled 🟢, any sell buttons you press will require an additional confirmation. This can protect you from accidentally clicking sell buttons. **This does NOT interfere with **\_**Auto Sell**\_**.**
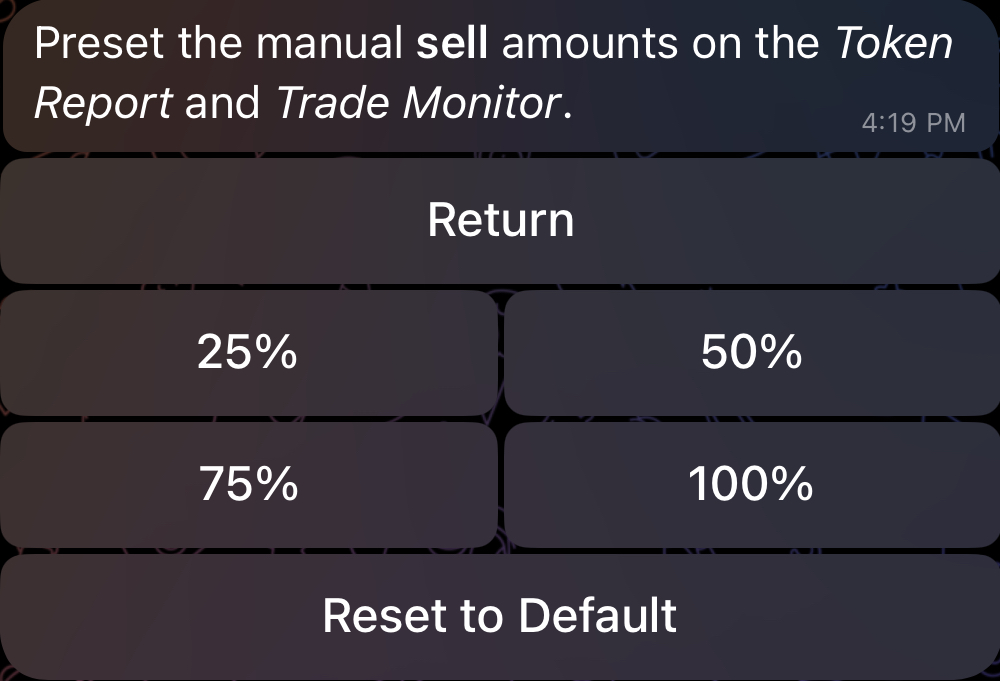
### 🔢 Sell KB
Assign customized values to the sell keyboard as shown below. You also have the option to reset the values to the default ones.
We explain the available options below:
### 🟢 | 🔴 Confirm Manual Sell
When enabled 🟢, any sell buttons you press will require an additional confirmation. This can protect you from accidentally clicking sell buttons. **This does NOT interfere with **\_**Auto Sell**\_**.**
### 🔢 Sell KB
Assign customized values to the sell keyboard as shown below. You also have the option to reset the values to the default ones.
 ### **Gas Price/Delta**
Refer to the [*Gas Price*](/sniper/global-settings/buy-settings#gas-price) and [*Gas Delta*](/sniper/global-settings/buy-settings#gas-delta) explanations detailed in the [Buy Settings](/sniper/global-settings/buy-settings) page.
### Price Impact Alert
As an additional layer of protection, the bot will automatically display an alert for **manual and automated sells** when the estimated price impact of the trade is beyond the value of ***Price Impact Alert***. This alert can be bypassed by manually forcing the trade through, as shown in the figure below. By default, ***Price Impact Alert*** is set to 20% for sells but you can tune the value to effectively control the threshold at which the alert will be displayed.
### **Gas Price/Delta**
Refer to the [*Gas Price*](/sniper/global-settings/buy-settings#gas-price) and [*Gas Delta*](/sniper/global-settings/buy-settings#gas-delta) explanations detailed in the [Buy Settings](/sniper/global-settings/buy-settings) page.
### Price Impact Alert
As an additional layer of protection, the bot will automatically display an alert for **manual and automated sells** when the estimated price impact of the trade is beyond the value of ***Price Impact Alert***. This alert can be bypassed by manually forcing the trade through, as shown in the figure below. By default, ***Price Impact Alert*** is set to 20% for sells but you can tune the value to effectively control the threshold at which the alert will be displayed.
.jpg) ### 🟢 | 🔴 Slippage
Choose the slippage tolerance for your sells. In some chains, using extremely high slippage values is dangerous since you can get frontrun by MEV bots, so please use a suitable value, or utilize *Smart Slippage*.
### 🟢 | 🔴 Smart Slippage
*Available on ETH, BSC, Base, Avalanche and Arbitrum*
This allows slippage to automatically adjust based on the token’s taxes and the price impact of your trade. This is not suitable for volatile situations like launches and snipes. We recommend you pair it with high *Gas Price/Delta*. **Keep in mind that **\_**Smart Slippage**\_\*\* overrides any custom slippage values you might have selected earlier.\*\* In other terms, when *Smart Slippage* is enabled 🟢, *Slippage* is disabled 🔴 and vice versa.
**In most cases, manual sells and auto-sells (Limit Sell Orders) will rely on the **\_**Gas Price/Delta**\*\*\* and \*\****Slippage***\*\* settings specified in your \*\*\***Global Sell Settings**\_**, so make sure you configure them properly.**
### 🟢 | 🔴 Auto PnL Card
If enabled 🟢, the bot will automatically generate a PnL Card following every sell. The generated card is customizable through two options: "Duration" and "Inv. & Payout".
#### 🟢 | 🔴 Duration
If enabled 🟢, the PnL Card will display the trade duration.
#### 🟢 | 🔴 Inv. & Payout
If enabled 🟢, the PnL Card will display the invested amount and the payout received after selling, both in native currency.
### 🟢 | 🔴 **Auto Sell** on Manual Buy
If enabled 🟢, the bot will automatically create the sell limit orders defined in "**⚙️ Sell Limit**" following every **manual buy**. If *Auto Sell on Manual Buy* is disabled 🔴, no sell limit orders will be automatically added following a manual buy, even if you have them defined in "**⚙️ Sell Limit**".
For **automated buys**, you can enable *Auto Sell* and further customize sell limit orders through dedicated Signals, Copytrade and Auto Snipe settings.
### **⚙️ Sell Limit (Presets)**
If you click on "**⚙️ Sell Limit**", you will be redirected to the following menu which allows you to preset and define sell limit orders to be automatically applied after a manual buy:
### 🟢 | 🔴 Slippage
Choose the slippage tolerance for your sells. In some chains, using extremely high slippage values is dangerous since you can get frontrun by MEV bots, so please use a suitable value, or utilize *Smart Slippage*.
### 🟢 | 🔴 Smart Slippage
*Available on ETH, BSC, Base, Avalanche and Arbitrum*
This allows slippage to automatically adjust based on the token’s taxes and the price impact of your trade. This is not suitable for volatile situations like launches and snipes. We recommend you pair it with high *Gas Price/Delta*. **Keep in mind that **\_**Smart Slippage**\_\*\* overrides any custom slippage values you might have selected earlier.\*\* In other terms, when *Smart Slippage* is enabled 🟢, *Slippage* is disabled 🔴 and vice versa.
**In most cases, manual sells and auto-sells (Limit Sell Orders) will rely on the **\_**Gas Price/Delta**\*\*\* and \*\****Slippage***\*\* settings specified in your \*\*\***Global Sell Settings**\_**, so make sure you configure them properly.**
### 🟢 | 🔴 Auto PnL Card
If enabled 🟢, the bot will automatically generate a PnL Card following every sell. The generated card is customizable through two options: "Duration" and "Inv. & Payout".
#### 🟢 | 🔴 Duration
If enabled 🟢, the PnL Card will display the trade duration.
#### 🟢 | 🔴 Inv. & Payout
If enabled 🟢, the PnL Card will display the invested amount and the payout received after selling, both in native currency.
### 🟢 | 🔴 **Auto Sell** on Manual Buy
If enabled 🟢, the bot will automatically create the sell limit orders defined in "**⚙️ Sell Limit**" following every **manual buy**. If *Auto Sell on Manual Buy* is disabled 🔴, no sell limit orders will be automatically added following a manual buy, even if you have them defined in "**⚙️ Sell Limit**".
For **automated buys**, you can enable *Auto Sell* and further customize sell limit orders through dedicated Signals, Copytrade and Auto Snipe settings.
### **⚙️ Sell Limit (Presets)**
If you click on "**⚙️ Sell Limit**", you will be redirected to the following menu which allows you to preset and define sell limit orders to be automatically applied after a manual buy:
.jpg) #### Limit Type
Select the type of the sell limit that you would like to add. There are three possible types: *Take Profit*, *Stop Loss* and *Trailing Stop Loss*.
*Trailing Stop Loss* is a powerful variation of Stop Loss that acts by adapting the price or market cap at which the sell limit order as the price of the concerned token increases. This will allow you to secure some profits as the market price of the token fluctuates. It should be noted that *Trailing Stop Loss* will never decrease the price or market cap at which the sell limit order will trigger.
#### Percentage Change
For *Take Profit*, the *Percentage Change* must be positive. For *Stop Loss* and *Trailing Stop Loss*, it must be negative. The *Percentage Change* is applied on the **entry price of your trade** to determine the price at which the sell limit order should trigger at. In other terms, the sell limit order will trigger when the difference between your trade entry price and the current token price matches *Percentage Change*.
Whether this entry price accounts for fees depends on your [*Initial Includes Fees*](/sniper/global-settings/general-settings#or-initial-includes-fees) setting, and the same rule applies to *Take Profit*, *Stop Loss* and *Trailing Stop Loss*:
* When *Initial Includes Fees* is enabled (the default), the entry price is computed while considering your buy amount **and the gas/bribe fees incurred**. This keeps transaction fees from eating into your net profit.
* When *Initial Includes Fees* is disabled, the entry price ignores transaction fees and only considers your buy amount.
For *Trailing Stop Loss*, the *Percentage Change* will also serve as the “anchor” value.
#### **Balance**
Specify the percentage of your token balance that will be sold when the sell limit order is triggered. It is important to note that sell limit orders always act on your **total balance of the token**. For example, setting the *Balance* to 50% will sell half of your token balance at the time of trigger.
#### **Duration**
Specify the duration in hours for which this sell limit order will remain active once it's automatically added or created for a specific token. The maximum duration is 168 hours (7 days).
This wraps up the *Global Sell Settings.* We can now move on to the *Global Approve Settings*.
#### Limit Type
Select the type of the sell limit that you would like to add. There are three possible types: *Take Profit*, *Stop Loss* and *Trailing Stop Loss*.
*Trailing Stop Loss* is a powerful variation of Stop Loss that acts by adapting the price or market cap at which the sell limit order as the price of the concerned token increases. This will allow you to secure some profits as the market price of the token fluctuates. It should be noted that *Trailing Stop Loss* will never decrease the price or market cap at which the sell limit order will trigger.
#### Percentage Change
For *Take Profit*, the *Percentage Change* must be positive. For *Stop Loss* and *Trailing Stop Loss*, it must be negative. The *Percentage Change* is applied on the **entry price of your trade** to determine the price at which the sell limit order should trigger at. In other terms, the sell limit order will trigger when the difference between your trade entry price and the current token price matches *Percentage Change*.
Whether this entry price accounts for fees depends on your [*Initial Includes Fees*](/sniper/global-settings/general-settings#or-initial-includes-fees) setting, and the same rule applies to *Take Profit*, *Stop Loss* and *Trailing Stop Loss*:
* When *Initial Includes Fees* is enabled (the default), the entry price is computed while considering your buy amount **and the gas/bribe fees incurred**. This keeps transaction fees from eating into your net profit.
* When *Initial Includes Fees* is disabled, the entry price ignores transaction fees and only considers your buy amount.
For *Trailing Stop Loss*, the *Percentage Change* will also serve as the “anchor” value.
#### **Balance**
Specify the percentage of your token balance that will be sold when the sell limit order is triggered. It is important to note that sell limit orders always act on your **total balance of the token**. For example, setting the *Balance* to 50% will sell half of your token balance at the time of trigger.
#### **Duration**
Specify the duration in hours for which this sell limit order will remain active once it's automatically added or created for a specific token. The maximum duration is 168 hours (7 days).
This wraps up the *Global Sell Settings.* We can now move on to the *Global Approve Settings*.