# Ethereum, BSC & Base
The image below shows the Auto Snipe Settings of a random token on Ethereum. BSC and Base will have similar menus minus *Backup TX* and *Block-0 Tip* which are exclusive to Ethereum.
Auto Snipe Settings - Ethereum
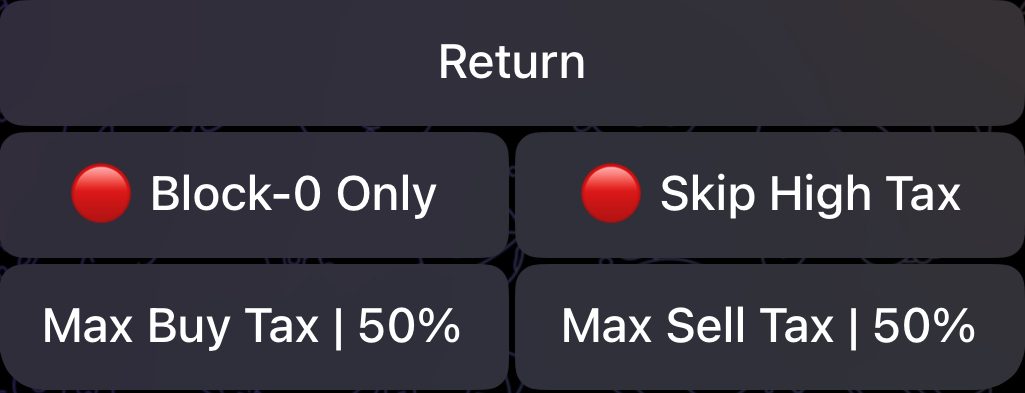
Clicking on the ⚙️ *Advanced* button will reveal some additional settings as shown below. The same settings will also exist for BSC and Base with the exception for *Block-0 Only* which is irrelevant for Base.
Auto Snipe Advanced Settings - Ethereum
We will now go over the options provided in Auto Snipe Settings:
### 🕵️♂️ *Simulate -* ⭐️ Premium Exclusive
This ⭐️ Premium feature allows you to simulate contract launches directly through the bot. Our launch simulations will automatically identify **deadblocks**, **launch taxes**, **launch methods**, and the contract's **max buy** **BEFORE** launch. This feature is mainly informational as Auto Snipe automatically handles all the above when sniping.
As detailed [earlier](https://docs.maestrobots.com/auto-snipe/auto-snipe-configuration/ethereum-bsc-and-base), the values for *Block-0 Tip*, *Multi Buy*, *Backup TX, Gas Delta, Block-0 Only, Skip High Tax, Buy Tax* and *Sell Tax* will mirror the ones specified in your [Auto Snipe Configuration](https://docs.maestrobots.com/auto-snipe/auto-snipe-configuration/ethereum-bsc-and-base). However, you have the option to change these values directly in the Auto Snipe Settings of the token.
### Max Buy
This represents the maximum amount (in ETH or BNB) that you're willing to spend for this snipe. The way Auto Snipe uses this value will be detailed below.
### Slippage Mode
There are three possible Slippage modes that you can select for an auto-snipe, and you can only enable one of them:
1. 🟢 | 🔴 Slippage: By default, this will use the *Slippage* set in your [Auto Snipe Configuration](https://docs.maestrobots.com/auto-snipe/activating-auto-snipe/ethereum-bsc-and-base). Once you enable 🟢 "**Slippage**", the bot will prompt you to insert a slippage value in case you'd like to use a different one.
2. 🟢 | 🔴 Min Token: Select the minimum percentage of supply (example: 1%) or minimum token amount (example: 1k) that you're willing to accept for your auto-snipe. Before triggering your auto-snipe, if Auto Snipe notices that you cannot afford this amount with your "**Max Buy**" then your auto-snipe will be automatically deactivated.
3. 🟢 | 🔴 Max TX Only: If enabled, Auto Snipe will ONLY trigger your auto-snipe if you can afford max TX at the time with your *Max Buy*. If not, then your auto-snipe will be deactivated. This is particularly useful if you're interested in getting max Tx or nothing.
### ✍️ *Pre-Approve*
As mentioned [previously](https://docs.maestrobots.com/global-settings/approve-settings), in order to sell tokens, you NEED to send a suitable approval transaction beforehand. When *Auto Approve* is enabled in your [*Approve Settings*](https://docs.maestrobots.com/global-settings/approve-settings), the bot will immediately and automatically send an *Approve* transaction after a successful auto-snipe, which allows you to sell whenever you want to from that point onwards. However, in case you'd like to initiate a sell **immediately** after a snipe, it's best to pre-approve the token before sniping it. All you need to do is click on "✍️ **Pre-Approve**" and the bot will send the *Approve* transaction for this token.
Now that you've configured the Auto Snipe, the last remaining step is to activate the snipe by clicking on the "🔴 **Auto Snipe**" button which will then become "🟢 **Auto Snipe**" as depicted in the image above.
With this set, the bot is now ready to automatically snipe the token as soon as it becomes "tradable", as defined by your configurations.
.jpg?alt=media&token=ec8c315c-f1a5-44ac-9e55-95e7677f5c54)